Wednesday, May 09, 2007

Success…

Gotcha... A trio of DD51's showing three livery variations in Yokkaichi.

Yokkaichi is not a pretty place: it’s a port city where oil tankers offload, and seems to be largely composed of refineries. What it does have is a large yard where you are very likely to see DD51’s. I can see that this won’t make the tourists flock to the place, but I appreciate it. I had the time and realised that my Japan Railways pass was still valid, so middle son and I went off for an adventure. The station is surrounded by the yard, which forms the exchange point for the port freight, and an intermodal terminal for Japan Railfreight’s mini containers. It also has a wagon repair depot and a permanent way shed. Funnily enough it reminds me of Bescot Yard in the UK, where I spent many hours as an impressionable youth.

I got pictures of several DD51’s and a couple of DE10 C-B locomotives as well. Thank goodness for Digital cameras… I confess to getting a bit carried away, but I had been looking for these locos for a while and as we fly out tomorrow it was probably my last chance. The people on the platform seemed bewildered by me wandering up and down the platform taking pictures of grubby engines. The one thing I missed was a blue and white industrial shunter, probably from the Ise Railway, which had been hidden behind a train of tanks. I was at the other end of the platform when the train pulled out and just saw it disappearing under a distant bridge.

Never mind. I can always come back next time.

Mindful that most people don't share my affliction, I've only included two images from the mass I took. #1029 stands ready for its next duty.

An added bonus was a decent shot of c-b DE 10 #1512 showing the unusual wheel arrangement.
I wonder why JR don't name their engines?

The Takasaki Light Railway

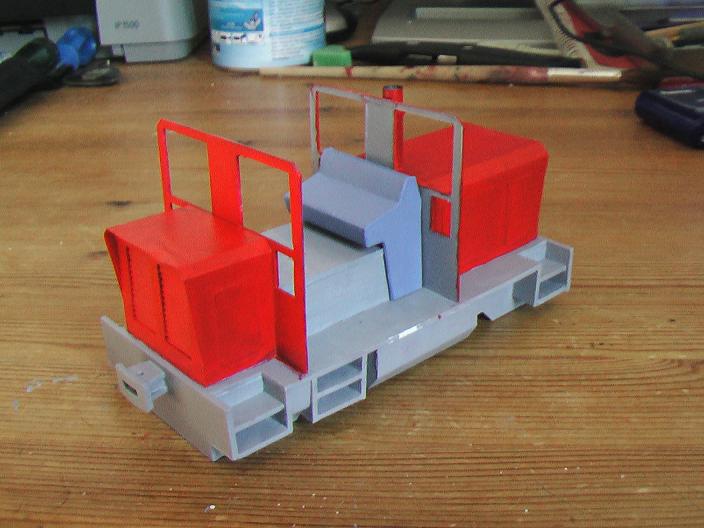
In Takasaki we met with Matthew Foster his wife Hiromi-san and Rinka, his little girl. Matthew is the owner of the Takasaki Light Railway, the only 16mm gauge model railway in Japan. Matthew has used a heck of a lot of ingenuity in making the line as there are almost no parts or kits available locally. He built his railcars (like the one in the picture) from card and plywood with a motor from a radio controlled car kit. Unfortunately the railway is being rebuilt so a visit wasn’t possible but the family kindly invited us out for lunch instead.

Tuesday, May 08, 2007

To the hills…

Nagano is in the mountains and is known for skiing, a sort of Japanese Zermatt, or what Zermatt would look like if the locals decided to build skyscrapers and a Shinkansen terminal in the middle. Between there and Nagoya is a lot of forest and lumpy bits, cut by rivers in deep gorges with spindly bridges, and a railway.


This is a bit of the mountain section. The line which peels off into a tunnel on the right as we leave the station is actually a long loop, one of several in the mountains which I expect speeds things up as the line seems to be running near to capacity: about every second station we passed a passenger or freight train.
You can see the tilt capability clearly on the curves. The wobble caused by me holding one of the boys while filming. I really need to get a tripod. In this video the train accelerated to about 80kph, so I filmed the next one when we were on a straighter section and moving faster- about 120kph at the beginning...


It's as wide as a British coach, seats fifty in comfort, and rides like a dream, but honestly, this is a Narrow Gauge train...


More on the DD51 theme…

Nagoya region has lots of DD51’s. Unfortunately they were still being secretive last week, so all I got was the occasional glimpse: I saw two shoot past on a tank train and a red one was prowling behind wagons in Yokkaichi. Two more had taken cover under a bridge which made it impossible to photograph them, and I missed another on a freight in the hills. To cap it all I missed one in quite spectacular fashion in Nagoya: a kind conductor offered to take our picture: just as he returned the camera...


Monday, April 30, 2007

The Elusive DD51

Tomorrow we head off to the hills to visit some of my wife’s relatives. We’re going by train, naturally, so expect a few more pictures. In my continued quest for modern narrow gauge I’m hoping to get some shots of the tilting diesel and electric MUs that run into the mountains. I travelled on these last time I was here and they really are fantastic units, comfortable and spacious, and pretty fast. I’m also going to keep an eye out for the DE10 C-B units that I’ve seen briefly on previous visits.
However, I really would like to Photograph an example of a Japan Railfreight (JRF) DD51. This shouldn’t be too much of a problem in theory: they are one of JRF’s main locomotives and they infest the Yokkaichi/Nagoya region which we’ll be travelling through. The DD51 class were built in 1962 or 1972-77 (accounts vary) I originally thought they were B-B-B wheel arrangement but it turns out they are B-2-B, which seems a bit odd but there is some cunning method for changing the overall axle weight from 14-15 Tonnes by by altering the pressure on the springs, according to the Japan Modern Transport Museum. They aren’t exactly beautiful, but they do have a very impressive presence with their long hoods and big centre cab (they are in fact 18m long over buffers). I have some vague idea about making a B-B-B locomotive, based on the general design, for the KÖB’s steep diesel-only section between Dachsburg and Spitzenwald, the rationale being that the container and wood traffic needed a powerful locomotive in the 70's but an early C-C unit had tried to straighten out the curves. I know I could ask for pictures, and there are a few online (The one above is from this Wikimedia Gallery), but very few show the side of the locomotive (Which I think is the most impressive view) and it’s nice to have your own picture anyway.
The probem is that DD51’s seem to be shy. Last week I saw some skulking behind a billboard in Shio-Hama which gave a good view of their wheel arrangement but very little else. As we left the station two more disappeared under a bridge. Naturally after I put the camera away. However, we will be covering a lot of mileage on a Japan Railpass and most of it on the 3’6” system, so hopefully there will be some chance to finally get a good view of a DD51. I’ve got a fresh SD card for the camera, Just in case.
I'll report on my success (or lack thereof) on Saturday…

Mystery Engine, and Where have all the pictures gone?

Firstly, I’d be interested to know the origins of this loco in the Kintetsu station at Shio-Hama (I think). All I’ve ever seen on the Kintetsu line is the endless procession of EMU’s so this got my attention. I suspect it’s an older loco retired into the depot to shunt EMU’s about, but any info is appreciated. I'm sure someone out there knows.
Secondly, I’ve realised the Blogger has started limiting the amount of space I have for pictures, so from now I’ll probably just have a small one like the one on this post, an it will be a link to my Flickr Gallery, unless the prototype is relevant for my own modelling purposes. However, I'm still taking loads of pictures: have a look here for more JR images and a set of shots of the standard Gauge Kintetsu line, with detail pictures of things like pantographs and overhead power supplies.

Halfway Point

I’m about halfway through this time in Japan, and I’m starting to twitch. I really want to get back to building models.

I’m filling the gap a bit by reading the current issue of “Narrow Lines”, the bi-monthly issue of the 7mm Narrow gauge Association, and “Model Railways on a Budget”, which was written a long time ago by C.J. Freezer. Some of the ideas may seem a bit ‘dated’ like the suggestion to use Post Office relays (Remember those?), but to be fair that’s not a fault of the book –it was published 20 years ago after all. It remains a useful item for those of us who have to really consider every expenditure and besides I’m a bit of a dinosaur with technology and naturally warm to suggestions like using bicycle spokes for point control.

I picked up my copy in a second hand bookshop on the Wensleydale Railway in the UK for an appropriately miserly four pounds. I don’t know if a similar book has been printed since- it would bee an excellent idea, and a good antidote to the style I see frequently in Germany, where everything is available off the shelf and model making is known as the rich man’s hobby. I was able to start again because I had just enough knowledge to keep my costs down, but anyone walking into my local model shop in Stuttgart would get the impression that you need to mortgage the house and have a handy spare barn to make a decent layout -which cannot be good for the future of the pastime. Hopefully there will still be a few of us bodgers who follow the less well travelled paths and are willing to compromise on perfection in order to have our ‘own” railway at an affordable price. Bicycle spokes and all…

Perhaps there is a “Low cost model making conspiracy”. Come to think of it, “Model Railways on a Budget” is a small red book. Is there a subliminal message here?

Virtual Modelmaking

This week I did a Very Silly Thing: I signed up for the ‘Gnatterbox’ after lurking about for some time. This is a forum full of very good and very friendly model makers, all building minimum gauge models of various descriptions. The main focus is Gn16: G-scale models on 16,5mm track (Used by some misguided souls for 00/HO standard gauge modelling) but last week I found the 09 section (Same scale as the Körschtalbahn but with 9mm gauge track) and I was hooked. Even worse, Colin Peake has updated his “Shifting Sands” gallery, which is built in this scale/gauge, and is beautifully modelled and detailed and pretty small too. Now I keep thinking about the 9mm gauge chassis I’ve got lurking in a drawer at home, and it occurs to me that it wouldn’t cost much to get a few Black Dog Mining wagons, and I could just transfer figures across from my main project when I want to... I’m sure a small shunting layout won’t take up much space…

Wednesday, April 25, 2007

Sunset on the Crossing…

I told you there would be more pictures here… This crossing is a favourite location ever since I first wandered across it a few years ago. As an added plus the sun shines along the track as it sets. Here’s some first attempts at linesiding there. Funny how you see some things after the event: I didn't notice the utility pole behind the barrier until afterwards. Ah well...

View towards the station


Toba bound train passes. Notice that this is about the same width as a standard gauge "sprinter" in the UK. So much for "narrow gauge is small" I set this up to quickly and cropped the top of the "X"


Cars crossing the line showing the cramped nature of the site. Just after I took this picture another car turned up from behind the camera.

After the sun went down one of the more modern two-car units turned up. Of course.
(Anyone who has information to add on any of the pictures please feel free to comment)


Monday, April 23, 2007

Reading Matter.

Now and again I have a good trawl through the Internet in the hope of finding some interesting model railway related websites, and this time I stumbled on a couple of very interesting sites. First on the list is the well known 7mm scale Narrow Gauge “Teetering by the Well” by Dave Balcombe, which is quite well known in 7mm circles and should have been on my links section ages ago, especially as Dave has been very encouraging about my own beginners efforts. The site is well written and entertaining: worth a visit even if it isn’t your “area of interest”.

I noticed the site belonging to David Mallot primarily because of the “.de” at the end of his web address, denoting a German domain, but stayed just because of the quality of his tiny 2mm finescale model, "Chapel Wharf". His aim was to show that “a small layout can be interesting to operate” his model is a bare 95 x 19 cm (38 x 7 1/2 inches) when in use and can fold down to fit in a 50x40x15mm carrying case. Staying with the ‘small’ theme, have a look at Bob Blackcloud’s micro layouts, which are many and various so I’m not going to try and describe them. Just have a look…

Finally a mention of John Teal, of the RJR branchline, (In the links section) who has sadly abandoned 7mm scale/0n30 and now runs something called “00” on his track. Never mind, it remains an interesting small scale garden layout, and the LMS train on his homepage does look pretty good. It will also be interesting to see how the transformation takes place...

(Update: I realised the link to Bob Blackcloud's layouts was broken. Should be fixed now...)

Saturday, April 21, 2007

Finally, pictures...

I’ve not had a lot of time and decent weather, but I was able to get a bit of linesiding in a couple of days ago before severe Jetlag kicked in.

There is a railway there: The black and yellow signs mark a crossing on the lump in the road. I like this location so there will be more pictures here.


Two railcars approach Ise Station from Toba on the 3’6” JR line

Ise is like a full-size model railway, with the sort of features that "Don't happen real life": 2 Track gauges, two big stations a train's length from each other. Railways climbing over each other on steep gradients and sharp corners, curling around a big railcar depot. which is accessed by a headshunt crossed by a busy level crossing. And it has a Junction.

Having dropped off the passengers the railcars pull forward over a crossing to the depot headshunt


Best picture so far- the railcars on the headshunt while the points are changed. The orange blur is a Kintetsu train passing behind. I'll post more Kintetsu images when I have time.

Back across the crossing into the depot. I think I may video this operation sometime as it doesn't really convey the atmosphere in still pictures.

The city is served by the Diesel operated 3'6" Japan Railways (JR) Line to Toba and the Standard Gauge, private Kintetsu line to Kashikojima. What it doesn't have is any kind of freight: Japan is a leader in passenger trains, but the rail freight tonnage is very low as a percentage of the total. We'll be travelling later this month and hopefully that will be a chance to get pictures of some of the impressive DD51 Co-Bo diesels and a few tilting trains into the bargin. I'll keep you posted and keep adding pictures. Anyone with more knowledge on Japanese Railways is more than welcome to throw in comments and corrections, and further info.

Wednesday, April 18, 2007

In Japan…


The ferry we used to get from the airport to the railway. A bit off topic, but I needed a picture and it's too wet to go and watch trains.

I’m over 9000km from my modelling bench, which slows down modelling a bit. I can’t even take the boys and do some line siding: monsoon was delayed this year and it’s walloping it down with rain. Even if I was prepared to get my camera wet, I doubt you’d see the results.

After we arrived in Japan we managed to use a ferry, bus, and train to get to Ise. The sea was a bit rough so the catamaran was thrown about somewhat, but once we were on land we were all fine again and walked from the railway station to my inlaws house. It’s very satisfying to finish a 9000km journey on foot, even if it was only 500m.

I was able to see the JR (Japanese Railways) station briefly as we arrived. It still has the same 2-car stainless steel DMU’s, which look like a Sprinter built by Budd, and the geriatric single car units that crawl around the coast. Alongside the JR system is the private standard gauge “Kintetsu” line.
It’s a bit like an interurban line with a fairly extensive network running to the coast and into the hills, electrified at 600vDC or 1500V dc depending on which source you read. I hope they know the difference. It also runs 1067mm (3’6”) and 762mm (2’6”) lines. It's interesting that the lines were obviously built using imperial measurements, but pretty academic as I can’t get any pictures. Hopefully the weather should improve tomorrow...

Monday, April 09, 2007

Contain Yourself 2

I was trying to make a highly original and witty title for this: as you can see I failed.


Finally the 20' ISO container is orange. It’ll have to wait until after Japan for transfers, but at least it’s the right colour. For a while it was a sort of sludgy brown- far too foul for public viewing.

The white box sitting atop the container is the result of some concentrated modelmaking on Saturday. Eventually this will be a swap body. Unfortunately the “Postal” idea flopped this time because I failed to make the side doors properly, so this one is a more traditional single-door unit.
The postal one will be the next project...
The most likely possibility is that it will be lettered for a farmers cooperative, but as you know I'm not terribly decisive on these things, so that may change.

The Swapbody is awaiting feet at the moment. The monster inside is some salvaged roofing lead from a friend's building project. Hopefully this will hold the unit on a wagon without having to resort to bluetack like I did as a teenager. For more pictures of model and prototype, click here

I had hoped to be able to report progress on a wagon but it seems that will have to wait until after the Japan trip. This Japan trip isn’t all bad: apart from a chance to see my two adorable little nieces, I can have a good look at the Japanese rail network, which is largely narrow gauge. Even better, my wife’s home town has a station with a sizable railcar depot so I expect I’ll be doing a fair bit of line siding, and posting more than a few pictures here.


I wonder if I can find a model shop…

Sunday, April 08, 2007

New Links

Web 2.0. is great, even for non-technical people like me who live in the prehistoric world of DC control and think “Chips” are something to be ordered with cod. I don't even have to know what I'm doing. Yesterday, for example, I added three new sites to the blogroll, without supressing a desire to shove the keyboard into the screen...

The first addition was the Dutton Bay Tramway, which is quite well known as an exhibition layout and has recently moved to a permanent home. I was sold on this one as soon as I saw the fleet of large diesels gracing the homepage.

Also from Australia is The Shelley Railway Company, a H0n30 model which by the looks of the current project will be hosting some big and very finely detailed trains fairly soon. (The line has its own gallery here, as part of the Australian Narrow Gauge Web Exhibition.)

Back in the Motherland, the Rhyd Ddu Railway blog has regular and entertaining updates from Colin Lea is on his model of the Welsh Highland railway, some good links, and interesting thoughts about model making in general. Thanks to Stephen at Fairlight Works for passing the last two along.

I’ll keep adding links as and when I find them or when kind people pass them to me, so if anyone reading this has a model, let me know the link and I'll have a look... I'm also getting the sidebar more organised so it’s quicker to find what’s where.

After all, it’s so easy to do...

Monday, April 02, 2007

Underground Modelmaking

I made it to the Exhibition. I think they were a bit bemused by me taking pictures of the wagons and leaving out their superb scenery. I didn’t realise it but the model is big, permanent (as in “part of the building”) and based on the Rhätische Bahn between Bergun and Filisur.

Notice the 2 well wagons to the rear of the train. I finally discovered they are carrying containers and swap bodies of all kinds, especially heavy ones (The thinking seems to be that the centre of gravity is as low as possible). They often get tacked on the back of the next passenger train so that consignments can be delivered quickly when there isn’t freight on the way. I’ll be going back to visit soon so I’ll inflict more pictures on you then. Here's a few in the meantime with more on the Flickr gallery.


Krokodil in Filisur


Refrigerated Swapbody on spiral


I said it was big...

And yes, I will get around to posting pictures of the half-finished container soon…

Thursday, March 29, 2007

Körschtalbahn Route map.

Today’s post was to be about the ISO container that’s (Just) visible in the last post, but unfortunately that isn’t happening because (1) The weather is foul and I haven’t got enough light, and (2) I haven’t had time to finish the container so it’s equally foul and I didn’t want to spoil your evening. So instead here’s a plan of the railway as it currently exists in my head. I’ll post the container another time… I’d be grateful to geographers for ignoring some of the more glaring inaccuracies. I’ll clean those up for a later version of the map.

Tuesday, March 27, 2007

Organised Modelmaking


Yesterday Stephan (My eldest son) and I spent the afternoon bashing nails into wood and produced “Daddy’s Modelling tools box” My modelmaking tools were languishing in old ice cream boxes and my wife was quite reasonably getting fed up of it cluttering our office/bedroom. It was this or be banished to the outer darkness of the cold utility room whenever I wanted to build anything.

Of course it was fun to build it with Stephan and he was really excited to be "Helping Daddy".

The funny coloured box on top is the ISO container, hopefully in the process of being painted into Hapag-Lloyd Orange, or an approximation thereof.

I organised all my bits last night and this morning Stephan insisted that I go through it with him, and show him the contents of each drawer (of "our box") in turn.

Wednesday, March 21, 2007

Going Postal

The "container question" continues. Whilst I'm not planning to make a collection like that on Nick Gurney's intermodal model, I think there may be more than one running on the KÖB, and I'm too cheap to get another kit, so I've been looking at tanktainers, swapbodies and roll-on containers and anything with flat sides until I resolve the "Corrugation issue"

And my goodness but there's a lot of possibilities. I may bore you with those another time, but this week I wasted my precious minutes creating a postal container based on those used by the Rhaetian Bahn. For those who aren't familiar with this company, it is a metre gauge line in Switzerland which doesn't seem to have heard that narrow gauge trains are old and can't carry big things. Amongst other heavy duty wagons including cement carriers, bogie tankers, roll-on container carriers and some very nice side-panel vans, they clearly have a contract with the Swiss postal service, and carry post in a fleet of swapbodies (If that’s the word for a lot of yellow boxes), which are designed to be accessible from road or rail. I first found these on the very comprehensive Schewizer Schmalspurbahn gallery where they are shown on well wagons, although I don’t know if this is for clearance or ease of access. The Railfan Europe site shows these and other similar swapbodies on normal four wheel wagons, which would be useful for my tiny layout.

Anyway, the drawing shows the general idea, please compare with the pictures of the real thing and let me know what you think. What would a UPS version look like?

Takeover? Maybe not...

The unanimous opinion on G1 in Connex livery was “Bring back red”. Thank goodness for image manipulation.

Connex are changing their name to Veolia now, and Paul Smith of Widnes Road fame tells me they are gradually changing the corporate colours to red and white. Their German website is changing too. It seems they have decided to follow my lead…

Being a Brit I can't resist mentioning that after a mild winter it started snowing yesterday...

Saturday, March 17, 2007

Location.

Or: More learning The Gimp…

Here is the location of the KÖB, just on the northeast corner of the Black Forest. All the railways apart from the KÖB are real, if rather inaccurately drawn. Spitzenwald is fictional, but the other towns all exist although Dachsburg is moved slightly. If you are so inclined, you can even find Wildberg on Google Earth by entering “72218 Wildberg Germany”

The numbered railways are all 1000mm lines that existed in the Black Forest:

1: “Todtnauerli” running from Zell im Wiesental to Todtnau;
2:Müllheim-Badenweiler, electrified, but I don't know what voltage- nand I can't find anyone who does, and:
3:“Alternsteigerle“, from Nagold to Altensteig

There were plans for another electrified 1000mm line from Todtnau to Freiburg and a steam operated one from Todtnau to meet the standard gauge near Titisee, but this was never built. Strangely, no-one really knows why.

This map was made for a magazine and had to be black and white. When I get time I’ll post a rather better colour map of the KÖB showing how Spitzenwald fits into the overall scheme of things. I have been planning Spitzenwald itself as well. More on that soon.

Wednesday, March 14, 2007

Takeover

I'm learning how to use "The Gimp" at the moment, and it occured to me that as Connex/Veolia Group run a lot of the local railways, with a bit of a different history they may well have taken over the KÖB, so I tried some image manipulation into their livery. What do you think? I think I prefer red.

This is not quite the sum total of my progress but it's not far off. I'm hoping that the current work deluge will calm down soon and I can get back to ma true vocation. Real progress may be a while though as we're off to visit family in Japan in April/May. On the other hand that's a chance to travel on/photograph/experience some real main line Narrow gauge so the blog will likely be active.

I've also found a model railway association around here which I may even join as they are very big on familiy activities involving model railways. We shall see...

Sunday, March 04, 2007

Contain Yourself...

I’m the proud owner of a grey resin box, just recognisable as a model iso container. No numbers, details, or even locking mechanisms as yet, but it’s a start. Besides, I’ve got all the help I need on details because there are websites out there belonging to container enthusiasts, people who travel around the place photographing containers. (Like this one for example). And why not? bearing in mind I’m keeping a blog of how I glue and paint bits of plastic, and was recently photographing seats in a local train (See last entry) I’m not about to take a superior attitude. Besides it’s a mine of information and I’ve learned enough to know how to make my own containers in future, so it’s even saved me some money…

I reckon a modern narrow gauge line would be into intermodal in a big way. Look at it this way- a transporter wagon or rollboks are complex bits of equipment, non-standard and very specialised. This will put the cost up. A container flat on the other hand, can be rebuilt easily from a standard gauge wagon, has to carry less weight and the transfer process uses standard cranes and systems. It’s much more flexible as well: a truck can take the load at the end of the line and carry it further into the hills.

That’s not to say I won’t have a few transporters on my line, they are too good to be left out completely. But they’re going to have some competition...

The containers are coming...

Seats


Thanks to the kindness of Colin Peake, who sent me some surplus examples, I’ve now got a collection of seats for the future carriage. I’m rapidly running out of excuses to get moving on that. One thing that is clear: I'm tending to build slightly overscale judging by the comparison with G1, so I'll have to watch out for that...


Incidentally, here's an example of modern German passenger seats on a local train. The window pillars bend in because it's the upper deck of a double deck unit. Great for seeing the view. You should have seen the looks I got for taking this picture.

Flu

This blog went a bit quiet for the last couple of weeks because I was snowed under with work, and then managed to catch the flu at the same time. Of course, having three small boys doesn’t allow a lot of rest. I’m not sure if it’s worse having flu with healthy kids who want to run around or with sick boys who need lots of cuddles… Either way it’s not conducive to modelling or blogging... But it's worth it for the extra cuddles.

Monday, February 19, 2007

Buffer Zone.

I finally built up courage to rebuild the Buffers on G1. The old is gone, the new is attached and works as far as I can see... Aware of my lack of prowess with the hacksaw I did the 'Non-stripey' end first, worked out hoe I could make it work, and then made a worse mess of the other end. The coupling seems to work as far as I can tell, but if I posted a picture now I think it would only depress you, so I'll wait until the buzbees are back on both ends before posting...

In the meantime I'll try and get some time for the container, which is looking reproachfully at me whenever I look at the modelmaking box. The wheels I ordered turned out to be too big, so I'll have to order a fresh set.

Wednesday, February 14, 2007

Buzz Buzz...

I finally painted stripes on one end of G1 using the old method of putting masking tape on glass and cutting it. This was an experiment: the buffer beam will probably need rebuilding for the DG couplings I'm going to try and install over the next few weeks, but I figure that if I can make the stripes once I can do it again.

I got fed up of waiting for a sunny day and took a couple of pictures. click on the image above to see the rest...

Sunday, February 04, 2007

Brighter Day

Yesterday was a bit brighter, so I spent some time experimenting and taking model pictures with the card background. For (many) more views click on the picture. I was trying out different ideas for lighting and camera settings. That's my excuse anyway.
By the way, I got a lot of ideas for this, including the basic set design, from Bob Boudreau's "Basic Modelrailroad Photography" website.

Friday, February 02, 2007

Intermodal


Another recent addition to my collection of bits is a container kit from the GJH Plant Company. I wanted to get a kit for the first example so I could be really sure I was making it the right size, and get a feel for the details. we will see how this goes, but first impressions are that it's well within the loading gauge and should look good on the back of a KÖB freight wagon.
By the way, I'm aware of the failings of the background and lighting in this picture so today at great expense I bought a photographic background. All right, so it's really an A1 Piece of white card but I'm guessing no-one will notice the difference, and I know you can keep a secret. As soon as the sun comes out, I'll have a go taking some pictures.

Wednesday, January 31, 2007

Good Omen.

The three model figures arrived this morning: I put one next to the Growler as soon as I could, and it seems that the loco isn’t far off. As G1 was built using a mixture of Oe loading gauge; woolly maths and guesswork I was quite relieved about this. As the lighting was marginally improved this morning I took some pictures while I was there. The figures fit the door well, although the driver's desk will need cutting down a little. The size of the beastie shows this isn’t a little critter out of the backwoods: its scale size is comparable to a British Railways Class 08, and this is just a shunter. Who said narrow gauge was small?

More images in the Flickr Gallery

Tuesday, January 30, 2007

Interlude...

In what fortunately turned out to be a false alarm, our youngest (3 months) was ambulanced to an emergency room at about seven this morning after we found him under his blanket and he didn’t want to wake up. It turned out that he just had a virus and the blanket was no problem to him, we were back home by 0930

It’s remarkable how this sort of thig leaves you rattled though. I’m giving up all thought of work today so we can get some family time. Some more bits have arrived and I may take some pictures later.

Monday, January 29, 2007

MRM

Modern Railway Modelling asked me to write an article last year and they seemed to like it, as it’s in their spring 2007 edition, and the editor has asked for more material. Specifically they are interested in reviews of models not available in the UK. I have a agreement with a local model shop to take pictures, but as it's several kilometres away I'm trying to get a small portable photo studio together... Anyone with ideas, let me know...

Thursday, January 25, 2007

Vision...


I’ve got a new camera at last, actually something I was planning to do long before the old one broke down. I was testing it after it arrived this afternoon, and of course I had to try out the macro function. So here is a progress picture of Growler one, warts and all, and just waiting for its driver to arrive from Omen.

If it looks a bit shiny, that’s because I used a gloss varnish, I’ll see how this looks but it’s likely to be painted over with matt after the next visit to the Baumarkt (DIY/Hardware store)

No, it's not on the track, it isn't even on its chassis, but don't tell anyone...

Monday, January 22, 2007

Spending money.

I’ve finally taken the plunge and ordered bogie parts and wheels, ater a lot of kind assistance from various persons on forums and Alan Gibson. All I need to do with G1 now is put on the lacquer and finish or replace the roof, possibly put a number on it and install a driver. I've had a look at my modelling budget and ordered a few bits and pieces, like some Y25 and Gloucester bogies from Cambrian models, and I’m hoping to build a van and a container wagon to run on them, and when I've built up my courage, some sort of driving trailer. This would be partner to the as yet still mythical railcar.

For building all this I’ve also ordered some plasticard (from Slater’s in Matlock: I know there must be somewhere that sells plasticard in Germany but Google can’t find them) and three figures from Omen. Now to see if the doors on G1 really are the right size...

Tuesday, January 16, 2007

Invisible Progress

I am still working on Growler 1, honest, it’s just that our digital camera has decided not to work for some reason so I can’t take pictures. If I could, you’d see that the glazing is in, and the cab completed. I’m not totally happy with the joins on the corners, but apart from that it’s come together well. The project was intended to be a learning experience rather than a fine scale model anyway, and the beauty of this scale is that I can always build another body to fit on the chassis later as my skills improve. Hopefully.

I’m also hunting down bogies for the next project, which I reckon will be some bogie freight stock. I’ve found some kits but I’ve now got to find some wheels with bearings. It’s a far cry from my teenage modelmaking and getting everything ready to run in a nice red box, but there’s no way I’d want to go back...

Blog info

I've changed to the new Blogger, as much to avoid their repeated "This would be much better in beta" messages whenever I logged on. What they don't tell you is that Beta only works with Windows 2000 or later, as I discovered when I tried to log on with a computer using Windows 98. On the other hand they have a far easier interface to put links and stuff on to the template so I've finally been able to link to those people who have linked here and a few more besides. In the side bar there is now a link to John Teals models, usually in the Garden but at the time of writing indoors hiding from the cold. John Sharp's "It's just playing trains" shows what can be possible if you brave the elements -and have the courage to buy a lathe. (Incidentally, John's Journey in to sound blog is also worth a visit if you like folk music.)

My modern railways bias shows in the blog of Nigel Burkin from Scotland, who is building a large log cabin in his garden to house his railway, and Paul Smith's Photoblog of Widnes Road, a pleasantly simple diesel depot set in North West England during the 1980's, about the time I was growing up in the area. Lots of inspiration, and it almost makes up for the lack of visible progress on my layout...

Now to go back to what I should be doing... Sorting out my tax forms for 2006...

Tuesday, January 09, 2007

Busman's Holiday


Back home after a long overdue holiday flat sitting for a friend who lives near the french border. Mind you, I've been doing a bit there as well. Spurred on by the article that was published, I spent a day with Stephan, my oldest son, travelling around local stations and taking pictures for future articles. I’ve now got a small pile of films to be developed. The apartment where we were flat-sitting was owned by an ex-locomotive driver, so I ended up in a lot of long conversations which gave me far more material that I thought possible, and which improved my German as it was all given in “Elsaßich”, the local dialect in the region.

We returned on Tobi’s second birthday, and missed our train. Fortunately in Germany this just means you have to catch another train, and in our case we ended up going through the Black Forest, which took longer but gave us some awesome views, and then we met a very friendly driver who not only let us go in the cab but allowed Tobi to sit on his seat as a birthday treat. Stephan and I then travelled in the cab for about half the journey home, which Stephan loved and which gave me enough information to start yet another article...

Thursday, December 28, 2006

Spot The Difference


I notice from other people's blogs that you have all been equally busy during Christmas, so I don’t feel too guilty about the lack of updates. I have been working on G1 from time to time, which is hopefully evident in the picture. There is a difference if you compare it with the last one… five thin acrylic washes (and a clear varnish) have turned G1 from pink to red. Another red went on this evening. The final clear varnish will probably be added soon and I'll touch up the grey, which is already looking a bit scuffed in places from my constant handling. The picture is a bit better lit than before: I don’t have any lighting facilities except the sun and a south-facing window, so I had a brief rush to take pictures when the sun came out.

I’ve decided to try and finish the loco but work on other things like figures and couplings before I start detailing. I’m also looking to see what the next major project may be. I now have some money for a pair of Bull ant bogies from Hollywood Foundry, so I’m eventually going to build a railcar of some kind for the people of Spitzenwald, but I think the Growler looks a bit forlorn with no trucks to play with, so while I figure out how to order the power units, I’m going to get designing some freight stock.

Think intermodal...

Monday, December 18, 2006

Growler 1, now in Technicolor…


I entered the weekend determined to get something done on the Growler. I painted it with primer a week ago but since than it’s been gathering dust while I filled my time with unimportant stuff called “work”. I had a small delay when it dawned on the great brain that I needed to fit access hatches on the bonnets, which involved a rather dramatic discovery of what solvent based glue does to acrylic paint. On Saturday I finished and primed that, which brought me back to the place I’d thought I was two days earlier, and I finished the first coat of grey on the frame, and then on Sunday was able to make a start on the body, so at this moment I have a pink engine. Click on the photo to see more.

G1 is intended to be a “recent delivery”: a new locomotive that arrived on the Körschtalbahn a few months ago, possibly on lease, so it’s still going to be in its factory colours for a while. On the other hand I’m still looking for a colour scheme for the railway, and I’m impressed by the new livery Nedtrain have applied to the Vossloh units they’ve bought. Hmm…

More blatant publicity…

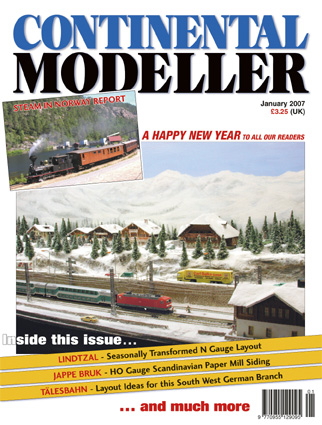
I've had another article published. This time it's in the January issue of “Continental Modeller” Magazine, about the Tälesbahn, a privately owned standard gauge branch line near here. CM used it as their “Plan of the month”. Living here gives me the advantage that I can research and visit these little-known places that almost no-one has heard of, and CM has two more articles waiting in their files which will be published when they are truly desperate for something to fill space. Another magazine has said that they will probably print an article in the spring. I’ll keep you posted…

Monday, December 11, 2006

Körschtalbahn History part 3: Rebuilding and Betrayal (1949-1979)

Continuing the history of the fictitious Körschtalbahn. To start at the beginning go here.

In 1945 anyone could see that the railway was severely run down. The one remaining Mallet had kept going in the final months of the war, as the generating equipment spent more time broken than operable, and the railcars were so worn out they sagged in the middle. A daily mixed train had run each way during the war but it was alarmingly apparent that the track was highly unstable, straight sections having taken on the appearance of a length of wet spaghetti. None of the signals worked and once a train disappeared up the valley no one knew where it was. There was nothing anyone could do except hope it would make it back sometime, and on at least one occasion the passengers spent an uncomfortable night on board as the crew pulled the mallet back on the track. All services stopped a week after the end of the war. The line lay unused until it became clear that permanent closure was not an option and the occupying French forces made enough repairs for a limited steam hauled service to run as far as Dachsburg by Christmas 1945, with trains returning to Spitzenwald in summer 1946.

As the “economic miracle” took place in West Germany the line found itself carrying more traffic. For a while the new Deutsche Bundesbahn dragged its feet on investment, but eventually the State of Baden-Württemberg stepped in and funded repairs to the permanent way and overhead wires, and a new electric railcar. Someone somewhere was pushing for electric operation to Spitzenwald: a study was carried out in the late 50’s but nothing came of it, and a used diesel was bought at the end of the decade to replace the two war era locomotives. It was joined by a MAN diesel railcar, either second or third hand -nobody was entirely sure- but it behaved well and growled its way through the upper valley every day with a couple of freight wagons in tow.

On June the 28th 1961 the line bade farewell to steam as part of the 60th anniversary celebrations, and promptly began running a summer tourist service with the Mallet a year later. In the mid 60’s the road to Dachsburg and beyond was rebuilt, but no amount of rebuilding could quite straighten it out and the railway continued to offer a competitive journey time. By now the line was operating a daily passenger service with the main peak in the morning, a school service mid-afternoon and a second smaller peak in the early evening as people returned from Wildberg and beyond.

On paper the line seemed secure, but already there were clouds on the horizon: ever more trucks were coming into the Körschtal, causing damage and pollution to the pristine valley, and undercutting the railway. The Körschtalbahn management and local towns had been clamouring for investment in freight transfer facilities, seeing that an ability to handle containers would be vital to the line’s future, but all was in vain. As the 1970’s drew to a close DB seemed deaf to all requests and calls for improvements, even when the local governments offered to foot the bill. It seemed that the national railway company was uninterested in further work on narrow gauge railways and quite happy to allow the Körschtalbahn run into the ground.

(To be continued)

Still here…

I’m still around and doing what I can with the model, which isn’t a lot as work has been very heavy of late. There was no letup even this weekend, although that means that I’m able to get a couple of half days in lieu, so hopefully there will be a bit more action in the near future…

Monday, December 04, 2006

Test Piece


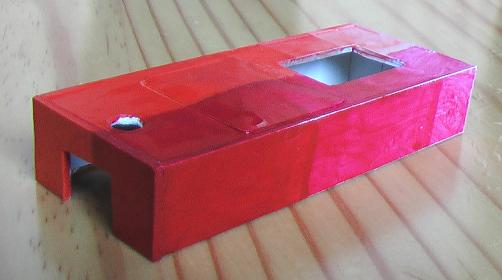
I’ve been slowly painting a test piece of plasticard (One of the failed chassis pieces, which has since been drilled, cut and glued to test all sorts of stuff) over the week the better to figure how to use acrylic paint, the results are shown in the picture above. As per instructions from Dave Balcombe and others, I slapped on thin washes and allowed the colour to build up. I’m at seven coats and counting. The ‘Red’ side (Cadmium red dark) seems to be coming along nicely, not too much evidence of brush strokes and a generally strong colour, if a bit dark. The ‘Orange’ side (Cadmium red light) was a test to see what colour it came out. One issue is that even after using a primer I find the paint rubs off easily. I’m hoping that this will be remedied with a coat of varnish, and that I don’t have to avoid handling the stock…

Monday, November 27, 2006

Finally, a cab...

After 3 attempts the cab sides for G1 are ready. I’ve not glued the lot together, but I couldn’t resist having a dry run to see how it looks. Hopefully the dodgy joins in the cab will disappear when it’s fixed properly. I don’t know what happened to the end of the short bonnet but it won’t go straight. The exhaust is a drinking straw, and I may try for a bigger diameter version. You’ll notice I’ve chickened out of interior details so far, and the railings. I think I need to move the buffers up a bit to fit the DG coupling in

More pictures on Flickr. Click on the photo to see them...

Paint.

The paint arrived last week. I'm using artist's acrylics because they are easier to get hold of in Germany. I've had a lot of advice from Dave Balcombe (of Teetering by the Well fame) and Colin Peake, builder of Shifting Sands, which I'm really grateful for, as I seem to have no colour sense. (Michiko, my wife is the opposite and has taken over home decoration, to the relief of all concerned) They suggest going for subdued colours and using brighter colours as tints with creams, browns and greys to keep the colours muted and together on the scenery. If I'm really persistent, maybe I can get Michi involved...

Wednesday, November 22, 2006

Slow progress…

I’ve made little visible progress in the last week or two. I’m waiting for the paint I ordered to come through, and in the meantime I’ve been looking for couplings that will work with my locos, and for modern 7mm figures.

The coupling problem is that I want to have link-and-pin couplings and automatic couplings working at the same time, which rules Kadee couplings out- they wouldn't fi t under that huge buffer. I’m hoping to build some transporter wagons one day and they will need to be coupled by a drawbar. In other words, I want to have the best of both worlds.

However, it seems I can get away with it. I’ve found that DG or B&B couplings will probably lurk unobtrusively under the buffers on G1, giving me the convenience of auto coupling and uncoupling, and still have prototypical coupling to drawbars.

I’ve also -with a lot of assistance from many different modellers- found a couple of sources for modern 7mm scale figures, which I was concerned about. One of them is actually quite close to where I live. Finally I’ve confirmed that the figures will be between 35 and 40mm tall which means my calculations for the doors (42mm, based on an assumption they would be a scale 6 feet) are correct. I’ve made the sides of the cab ready to fit. After painting...

Thursday, November 16, 2006

Körschtalbahn history part 2: 1901-1946

The second part of my entirely made up history of the Körschtalbahn. I suggest you start with the first part, here. Almost all the events in this story have happened on narrow or standard gauge railways in our region. I’ve just pushed them all together…

From the first ten years the line grew and the traffic forecasts were fulfilled, even exceeded by traffic returns. Several wood mills worked in the valley, and a steel works began production in Körschbrunnen. A mallet supplemented the two 0-6-0 tank engines in 1904. A second, heavier unit followed two years later. Together these powered up and down the Körschtal with their heavy wood trains.

However, there was now a problem. Coal costs money, and transporting the stuff cost more money. The directors had long been looking at the fast-flowing river Körsch and imagining the potential for cheap electricity. The more visionary ones were already drawing up cost/benefit analyses. In 1913 the decision was made to electrify the line, and the Körschtalbahn placed an order with the Esslingen Maschinenfabrik near Stuttgart for two electric c-c railcars.

In 1914 Electric power was switched on from Wildberg to Dachsburg. Originally it is clear that the directors wanted to have wires beyond the station at Dachsburg and up the final section to Spitzenwald, but the First World War intervened and steam remained on the upper section. The steam locomotives also continued to run on the lower Körschtal for freights that the railcars couldn’t handle. This did not stop the Government requisitioning first one and then both of the 0-6-0 tank engines for use on the Russian front, where they both disappeared. By the end of the war, the manpower difficulties had reduced the steam fleet to one Mallet, and the railcars were struggling with the increased traffic.

The chaos between the wars allowed for little investment, although two steeple cab locomotives were purchased second hand from a line in north Germany. As with all of the rest of Germany’s railways the Körschtalbahn came under national control in the 1930’s and for the next ten to fifteen years the story was one of overuse and under investment. Stone and wood were moved in huge quantities, so much so that two diesels were brought in to assist.

The Second World War would make depressing reading, so I’ll stick to saying that after the war the line was worn out. One Mallet was still operable and ran the whole length of the line when there were power failures, which were frequent. As the “Economic miracle” began to take place, and the industries grew in the Lower and Upper Körschtal, the line built up traffic, but it urgently needed new investment, new trains, and a complete overhaul of the infrastructure.

Continued on part 3.

Friday, November 10, 2006

Wood and Transhipment at Nagold


On Wednesday I had an appointment in Nagold, a town in the Black Forest. I went by train, of course.

Nagold is about ten kilometres south of Wildberg, where the fictional Körschtalbahn meets the real Nagoldtalbahn. It used to have its own narrow gauge railway running to Altensteig.

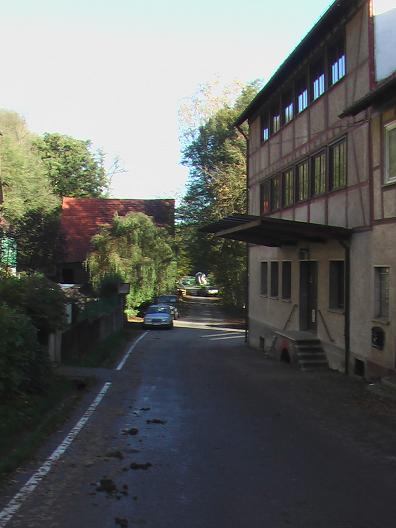
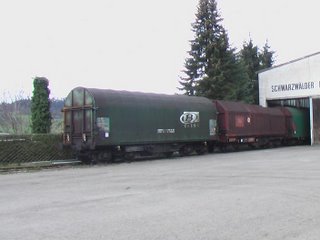
One of the reasons given for the demise of Narrow Gauge is the transhipment cost. It costs too much to tranship freight from standard gauge to narrow, and vice versa. The picture above shows a train of wagons (From Belgium, if you’re wondering), which have just been shunted into that shed for unloading; there’s apparently a freight train to Nagold, carrying different things every one or two days. The steel is put onto a truck and driven to a company based in Rohrdorf, who are steel distributors, and if that isn’t transhipment, I don’t know what is.

Rohrdorf is on the route of the old Narrow Gauge line. How much easier it would have been to simply shove those steel wagons onto transporters, or just transfer the load, onto narrow gauge wagons instead...


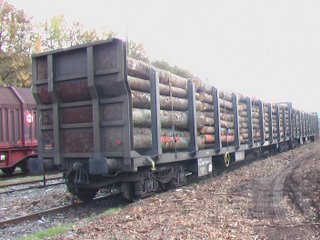
There are also wood trains. These Austrian wagons have clearly just been loaded, which conforms that the wood train I saw being loaded at Nagold on my last fleeting visit wasn't a one off.

I’ve got a few more pictures, which are on the Flickr gallery. I also got a brief look at Wildberg on the way through. It is a lot more mountainous than I thought, but there is a small valley running into the hills, which could easily be part of the Körschtalbahn. And the buildings are very distinctive and I didn’t have time to take photos.

Which just means I’ll have to go back again…

Thursday, November 09, 2006

New Links

I've just discovered that a blog I read has linked to me... It's just playing trains from John Sharp has me in his link section, which made a pleasant suprise. I'm also linked from the RJR Branchline by John Teal. Thanks for that!

Now I've really got to try and figure out HTML...

Monday, November 06, 2006

Taking Control...

Progress on G1 continues. I'm going to have to do some painting soon, find a driver to fit inside the cab. The great lump in the floor is the result of my not concentrating when I built the frames- I managed to put the biggest part of the motor there instead of under the bonnet... Hopefully it won't be too obvious when it's all painted. I've also realised my brilliant idea to use MSE Couplings won't work because they are designed to be in the middle if the buffer beam, right where the buffer is. However, it finally looks like a locomotive as opposed to a rail borne Skateboard. There's a few more views on my photo album, click on the picture to have a look.